オリジナルのWordPressテーマを作ってみたい
最近ブログを始める人も多くなってきていて、WordPressを使っている方も多いのではないでしょうか。
そんな中で、テーマから作れる人というのはそれほど多くないと思います。
ある程度のプログラミングスキルが必要ですからねw
ただ、Webデザインの勉強も兼ねてテーマ作成をしてみたい方もいるはず。
ということで今回、WordPressテーマの作成方法を紹介したいと思います。
基本デザインを作成する
デザインを決定する
一般的なブログなどでも多い、左に記事、右にサイドバーがある形で作成していきます。
本ブログも同様の形ですね。

HTMLを記述する
大枠が決まったところでさっそくhtmlの実装をしていきます。
基本構成は以下の4つからできています。
・コンテンツ
・サイドバー
・フッター
簡単ですね。
この枠だけをhtmlで記述するとこんな感じになります。
<!DOCTYPE html>
<html>
	<head>
		<title>タイトル</title>
		<meta charset="UTF-8">
		<link rel="stylesheet" type="text/css" href="css/style.css">
	</head>
	<body>
		<!-- ヘッダー -->
		<header id="header">
			◾️□◾️□ ヘッダー ◾️□◾️□
		</header>

		<!-- メイン -->
		<main id="main">
			<!-- メイン左 -->
			<div id="main-l">
				◾️□◾️□ コンテンツ ◾️□◾️□
			</div>
			<!-- メイン右 -->
			<div id="main-r">
				◾️□◾️□ サイドバー ◾️□◾️□
			</div>
		</main>

		<!-- フッター -->
		<footer>
			◾️□◾️□ フッター ◾️□◾️□
		</footer>
	</body>
</html>
具体的に枠内を記述した結果がこちらです。
◾️ヘッダー
<div class="header-content">
  <div class="head-title">
    <p>
      <a href="#">
        <h1>ブログタイトル</h1>
      </a>
    </p>
  </div>
  <div id="wide-navi">
    <nav class="global-navi">
      <ul class="flex">
        <li>
          <a href="#">ホーム</a>
        </li>
        <li>
          <a href="#">ブログ</a>
        </li>
        <li>
          <a href="#">お問い合わせ</a>
        </li>
        <li>
          <a href="#">カテゴリー1</a>
        </li>
        <li>
          <a href="#">カテゴリー2</a>
        </li>
      </ul>
    </nav>
  </div>
</div>
◾️コンテンツ
<!-- 記事 -->
<div class="article-container">
  <article class="tp-ar">
    <div class="tp-ar-l">
      <div class="thum">
        <a href="#">
          <img src="http://design-ec.com/d/e_others_50/l_e_others_500.png" alt="">
        </a>
      </div>
    </div>
    <div class="tp-ar-r">
      <div class="ar-content">
        <div class="ar-title">
          <h2>タイトルタイトルタイトル</h2>
        </div>
        <span class="ar-tag">カテゴリー1</span>
        <span class="post-date">2019年12月1日</span>
        <p class="ar-dicription">
          <a href="#">ダミーダミーダミーダミーダミーダミーダミーダミー</a>
        </p>
      </div>
    </div>
  </article>
</div>
◾️サイドバー
<aside>
  <div class="side">
    <!-- 検索フォーム -->
    <div id="search">
      <h4>検索</h4>
      <form method="get" id="searchform" action="">
        <input type="text" placeholder="検索するテキストを入力" value="" name="s" id="s">
        <input type="submit" alt="検索">
      </form>
    </div>
    <!-- カテゴリー -->
    <div id="category">
      <h4>カテゴリー</h4>
      <ul>
        <li>
          <a href="#">カテゴリー1</a>
        </li>
        <li>
          <a href="#">カテゴリー2</a>
        </li>
        <li>
          <a href="#">カテゴリー3</a>
        </li>
        <li>
          <a href="#">カテゴリー4</a>
        </li>
      </ul>
    </div>
    <!-- 最近の投稿 -->
    <div id="latest-post">
      <h4>最近の投稿</h4>
      <ul>
        <li>
          <div class="latest-content">
            <div class="latest-img">
              <a href="#">
                <img src="http://design-ec.com/d/e_others_50/l_e_others_500.png">
              </a>
            </div>
            <div class="latest-title">
              <a href="#">タイトルタイトルタイトル</a>
            </div>
          </div>
        </li>
      </ul>
    </div>
  </div>
</aside>
◾️フッター
<div id="footer">
  <div class="footer-content">
    <div class="footer-copright">
      <span>sample theme</span>
    </div>
  </div>
</div>
CSSでレイアウトを調整する
HTMLの実装が完了したので、次にCSSでレイアウトを調整していきます。
ただ、後ほども説明しますが、WordPressにテーマを入れた時に一部タグの構成(DOM構造)が変化することがあるので、ここではざっくりレイアウトを調整します。
こちらがちょこっとCSSを追記した結果です。

なんとなく、ブログっぽくなっていませんか笑?
あとは細かい配色とかなので、最後の方で改めて調整していきますね。
今回追記したCSSはこちらです。
h1, h2, h3, h4, h5, h6 {
    font-weight: bold;
}
/***********************/
/*ヘッダー*/
/***********************/
/*タイトル*/
header .head-title{
    font-size: 20px;
    line-height: 2em;
    padding: 0;
    margin: 0;
    text-align: center;
}
header .head-title a{
    text-decoration: none;
    font-weight: bold;
    font-size: 24px;
}

/***********************/
/*グローバルメニュー*/
/***********************/
.global-navi {
    border: solid 1px #E0DEDE;
    border-left: none;
    border-right: none;
}
.global-navi ul {
    margin: 0px;
    padding: 0px;
}
.global-navi ul li{
    box-sizing: border-box;
    list-style-type: none;
    width: 160px;
    height: 40px;
    text-align: center;
    border: solid 1px #f3f3f3;
}
.global-navi ul li a{
    text-decoration:none;
    display: block;
    overflow: hidden;
    width: 100%;
    height: 100%;
    line-height: 40px;
    text-decoration: none;
    position: relative;
}
.global-navi .flex {
    display: flex;
    justify-content: center;
}

/***********************/
/*メインコンテンツ*/
/***********************/
#main{
    margin: 0 10%;
    padding-top: 30px;
}

/***********************/
/*メインコンテンツ(左)*/
/***********************/
div#main-l {
    float: left;
    width: 100%;
    margin-right: -350px;
}
/*トップページ 記事*/
#main-l article{
    border: 1px solid #f3f3f3;
    display: flex;
    padding: 5%;
    margin-bottom: 10px;
}
.article-container {
    margin-right: 360px;
    margin-left: 0px;
    background-color: rgb(255, 255, 255);
    border-radius: 4px;
}
/*記事内のサムネイル画像*/
.thum img {
    width: 150px;
    height: 150px;
}
/*記事タイトル*/
.ar-title {
    font-size: 0.8em;
}
/*記事カテゴリー*/
.ar-tag {
    font-size: 0.8em;
}
/*記事日付*/
.post-date {
    font-size: 0.8em;
}
/*記事本文*/
.ar-dicription a {
    text-decoration: none;
}
.ar-dicription {
    font-size: 0.8em;
}

/***********************/
/*メインコンテンツ(右)*/
/***********************/
/*サイドバー*/
#main-r{
    padding: 0;
}
aside {
    float: right;
    width: 350px;
    padding: 0px;
}
#main-r .side {
    border: 1px solid #f3f3f3;
    padding: 5%;
}

/*カテゴリー*/
#category ul li {
    list-style: none;
}
#category ul li a {
    text-decoration: none;
    font-size: 0.8em;
}
#category ul {
    padding-left: 0;
}

/*最近の投稿*/
.latest-content{
	display: flex;
}
.latest-img img{
	width: 100px;
	height: 100px;
}
.latest-img{
	width: 100px;
	height: 100px;
}
#latest-post ul {
    padding: 0;
}
#latest-post ul li{
    list-style: none;
}
/*最近の投稿 タイトル*/
.latest-title {
    font-size: 0.8em;
}
.latest-title a {
    text-decoration: none;
}
/***********************/
/*フッター*/
/***********************/
footer {
    clear: both;
    padding: 0;
    text-align: center;
}
phpファイルを作成する
ページに動きを持たせるために先ほど作成したhtmlをphpに変更する必要があります。
ブログで記事を投稿、削除したりする必要があるので必ずこの作業が必要になります。
パーツごとにphpファイルを作成する
・コンテンツ → index.php
・サイドバー → sidebar.php
・フッター → footer.php
.png)
上記のイメージに従ってhtmlを分割して拡張性を.phpとしてファイルを作成しましょう。
◾️header.php
<!DOCTYPE html>
<html><head>
		<title>ブログタイトル</title>
		<meta charset="UTF-8">
		<meta name="”viewport”" content="”width=device-width,initial-scale=1″">
		<meta name="description" content="ディスクリプション">
		<link rel="stylesheet" type="text/css" href="css/style.css">
		<link href="https://use.fontawesome.com/releases/v5.6.1/css/all.css" rel="stylesheet">
	</head>
	<body>
		<!-- ヘッダー -->
		<header id="header">
			<div class="header-content">
				<div class="head-title">
					<p><a href="#"><h1>ブログタイトル</h1></a></p>
				</div>
				<div id="wide-navi">
					<nav class="global-navi">
						<ul class="flex">
							<li><a href="#">ホーム</a></li>
							<li><a href="#">ブログ</a></li>
							<li><a href="#">お問い合わせ</a></li>
							<li><a href="#">カテゴリー1</a></li>
							<li><a href="#">カテゴリー2</a></li>
						</ul>
					</nav>
				</div>
			</div>
		</header>
		<!--header end-->
◾️index.php
<!-- メイン -->
<main id="main">
  <!-- メイン左 -->
  <div id="main-l">
    <!-- 記事 -->
    <div class="article-container">
      <article class="tp-ar">
        <div class="tp-ar-l">
          <div class="thum">
            <a href="#">
              <img src="http://design-ec.com/d/e_others_50/l_e_others_500.png" alt="">
            </a>
          </div>
        </div>
        <div class="tp-ar-r">
          <div class="ar-content">
            <div class="ar-title">
              <h2>タイトルタイトルタイトル</h2>
            </div>
            <span class="ar-tag">カテゴリー1</span>
            <span class="post-date">2019年12月1日</span>
            <p class="ar-dicription">
              <a href="#">ダミーダミーダミーダミーダミーダミーダミーダミーダミーダミー</a>
            </p>
          </div>
        </div>
      </article>
    </div>
  </div>
  <!--main-l end-->
  <!-- メイン右 -->
  <!--main-r end-->
</main>
◾️sidebar.php
<!-- メイン右 -->
<div id="main-r">
  <aside>
    <div class="side">
      <!-- 検索フォーム -->
      <div id="search">
        <h4>検索</h4>
        <form method="get" id="searchform" action="">
          <input type="text" placeholder="検索するテキストを入力" value="" name="s" id="s">
          <input type="submit" alt="検索">
        </form>
      </div>
      <!-- カテゴリー -->
      <div id="category">
        <h4>カテゴリー</h4>
        <ul>
          <li>
            <a href="#">カテゴリー1</a>
          </li>
          <li>
            <a href="#">カテゴリー2</a>
          </li>
          <li>
            <a href="#">カテゴリー3</a>
          </li>
          <li>
            <a href="#">カテゴリー4</a>
          </li>
        </ul>
      </div>
      <!-- 最近の投稿 -->
      <div id="latest-post">
        <h4>最近の投稿</h4>
        <ul>
          <li>
            <div class="latest-content">
              <div class="latest-img">
                <a href="#">
                  <img src="http://design-ec.com/d/e_others_50/l_e_others_500.png">
                </a>
              </div>
              <div class="latest-title">
                <a href="#">タイトルタイトルタイトル</a>
              </div>
            </div>
          </li>
        </ul>
      </div>
    </div>
  </aside>
</div>
<!--main-r end-->
◾️footer.php
		<!-- フッター -->
		<footer>
			<div id="footer">
				<div class="footer-content">
					<div class="footer-copright">
						<span>sample theme</span>
					</div>
				</div>
			</div>
		</footer>
		<!--footer end-->
	</body>
</html>
WordPressにテーマを追加する
案外ここで詰まってしまうかたが多いかもしれません。
私も少しちょっと詰まってしまいました。
なので、テーマを追加する際の注意点も踏まえて説明していきます。
以下の対応が終わればテーマとして認識されますので、1つ1つ確認してみてください。
テーマに必要なファイルの準備
・index.php ⇦ 作成済み
・sidebar.php ⇦ 作成済み
・footer.php ⇦ 作成済み
・single.php ⇦ 新規作成
・page.php ⇦ 新規作成
・functions.php ⇦ 新規作成
ここで、3つほどファイルを追加しています。中身は空の状態で良いので、ファイルだけ作成しておいてください。
フォルダ構成の確認
以下の構成になっているか確認してみてください。
├ footer.php
├ functions.php
├ header.php
├ index.php
├ page.php
├ sidebar.php
├ single.php
└ style.php
特に以下の点に注意してください。
・style.cssが「css」フォルダないにないこと(上記の通りの階層であること)
私もやってしまっていましたが、style.cssが以下のようになっており、テーマとして認識されませんでした。
これはNGです。
└ css
└ style.php
style.cssにおきまりの説明を追加
WordPressのルールとしてstyle.cssには説明を記述する必要があるようです。
style.cssの上部に以下の情報を追記する必要があります。
Theme URL:
Author:
Author URL:
Version: 1
例)
/*
Theme Name: simple
Theme URL:https://anooblog.com
Author: ano
Author URL: https://anooblog.com
Version: 1
*/
FTPを使ってサーバーにアップロード
私の場合、「Cyberduck」というFPTソフトを使ってサーバーにアップしています。
人によって異なると思いますが、基本的に「themes」フォルダ配下にテーマを配置していきます。
「Cyberduck」のダウンロードはこちらからできます。
詳細なアップロード方法を別途お調べください。
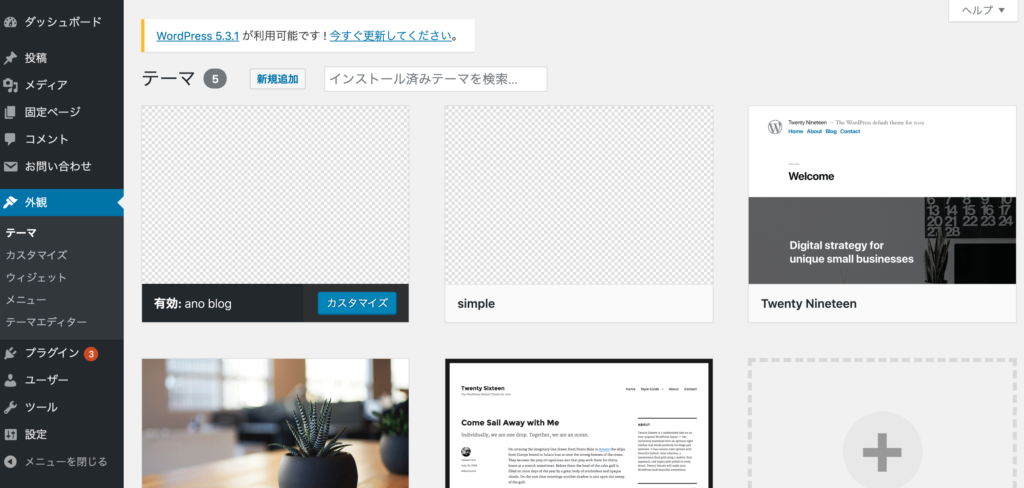
アップロードが正常に完了するとWordPressのダッシュボードのテーマに作成したテーマが追加されているはずなので、確認してみてください。
こちらでテーマ作成の基本がわかった思いますので、次はphpを記述して記事の投稿やメニューの追加などができるようにカスタマイズしていきます。
phpを記述する
functions.php
WordPressの基本機能をfunctions.phpに記述していきます。
ファイル名で私は結構はまりましたw。
ここで追加するのは以下の機能です。
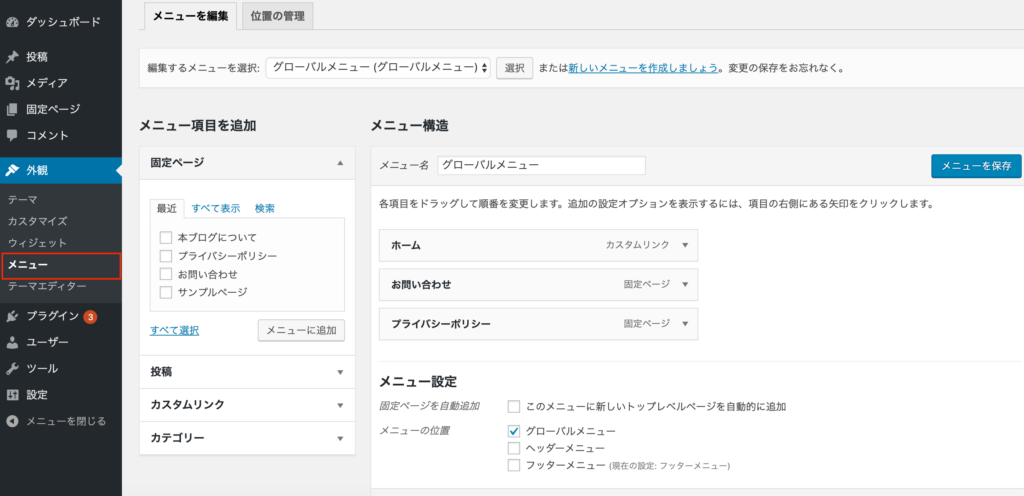
・外観-メニュー-メニュー設定
・外観-ウィジェット
・投稿-表示オプション(サムネイル画像)
◾️外観-メニュー
//メニューエリア表示
add_theme_support( ('menus') );
◾️外観-メニュー-メニュー設定
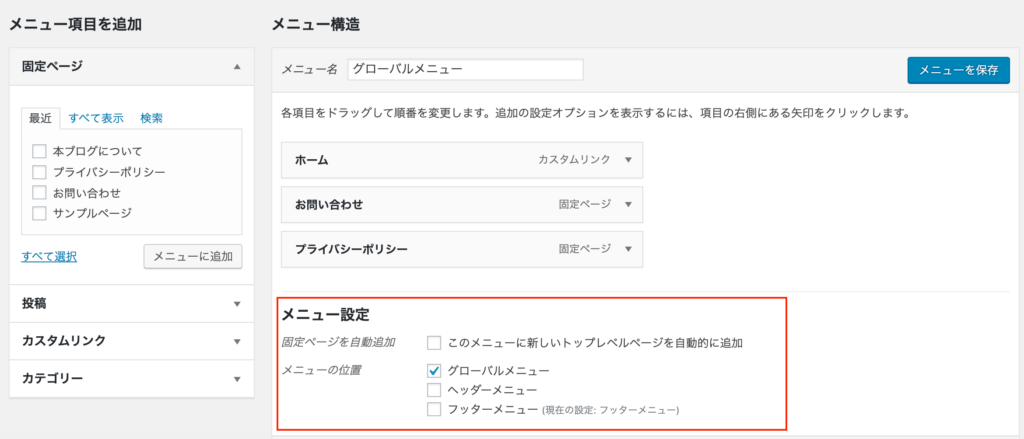
//メニュー設定表示
register_nav_menus( array(
	'global-navigation' => 'グローバルメニュー',
	'header-navigation' => 'ヘッダーメニュー',
	'footer-navigation' => 'フッターメニュー',
	)
);
◾️外観-ウィジェット
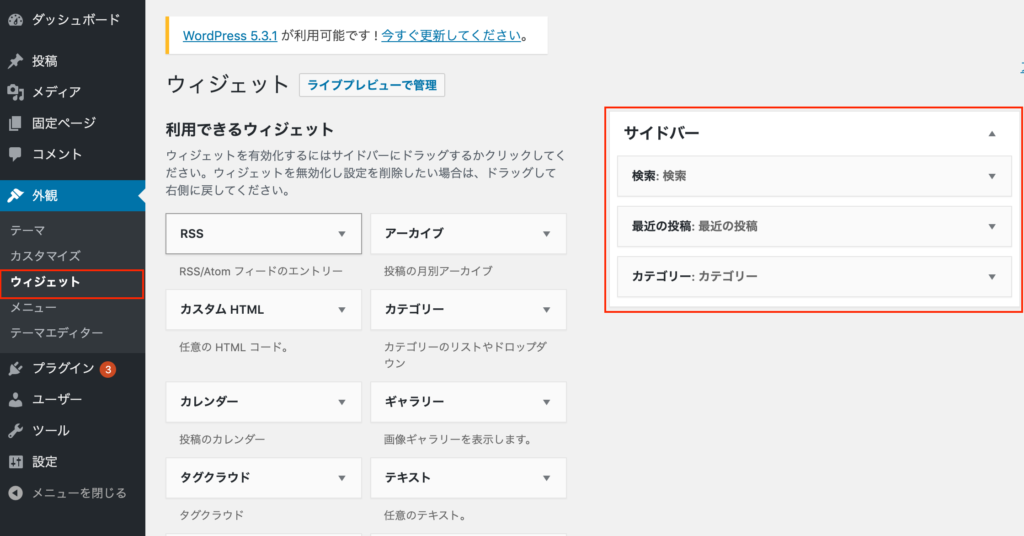
//ウィジェットエリア表示
register_sidebar(
	array(
		'name' => 'サイドバー',
		'id' => 'sidebar',
		'before_widget' => '<div class="widget %2$s">',
		'after_widget' => '</div>',
		'before_title' => '<h4>',
		'after_title' => '</h4>',
	)
);
◾️投稿-表示オプション(サムネイル画像)
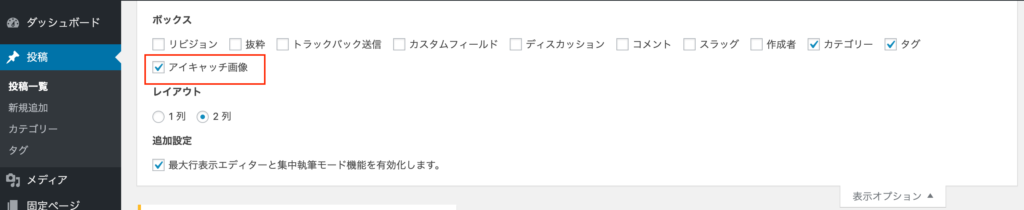
//サムネイル画像表示
add_theme_support('post-thumbnails');
◾️追加)style.cssの読み込み
WordPressではスタイルシートを更新したのに反映されないということが多々あります。
これはキャッシュが原因で、スタイルシートを変更した時は都度キャッシュを削除する必要があります。
そこで、以下のようにスタイルシートを版番号を付与することでキャッシュからの読み込みを避けることができます。
//スタイルシート読み込み
function my_styles() {
  wp_enqueue_style( 'style-name', get_template_directory_uri() . '/style.css', array(),'1.0.0');
}
add_action( 'wp_enqueue_scripts', 'my_styles' );
header.php
<!DOCTYPE html>
<html><head>
		<title>ブログタイトル</title>
		<meta charset="UTF-8">
		<meta name="”viewport”" content="”width=device-width,initial-scale=1″">
		<meta name="description" content="<?php bloginfo('description'); ?>">
		<link href="https://use.fontawesome.com/releases/v5.6.1/css/all.css" rel="stylesheet">
		<?php wp_head(); ?>
	</head>
	<body>
		<!-- ヘッダー -->
		<header id="header">
			<div class="header-content">
				<div class="head-title">
					<p><a href="<?php echo esc_url( home_url( '/' ) ); ?>"><h1><?php bloginfo('name'); ?></h1></a></p>
				</div>
				<div id="wide-navi">
					<nav class="global-navi">
						<?php
						wp_nav_menu(
							array(
								'theme_location' => 'global-navigation',
								'menu_class'     => 'global-menu',
								'container_class' => 'global-container',
								'depth'          => 0,
								'items_wrap'     => '<ul class="%2$s flex">%3$s</ul>',
							)
						);
						?>
					</nav>
				</div>
			</div>
		</header>
		<!--header end-->
index.php
		<?php get_header(); ?>

		<!-- メイン -->
		<main id="main">
			<!-- メイン左 -->
			<div id="main-l">
				<!-- 記事 -->
				<div class="article-container">
					<!--投稿している記事がある場合-->
					<?php if (have_posts()):
						while(have_posts()):
							the_post();
							?>
						<article class="tp-ar">
							<div class="tp-ar-l">
								<div class="thum">
									<!--記事へのリンク-->
									<a href="<?php the_permalink(); ?>" title="<?php the_title(); ?>">
										<!--サムネイル画像が存在する場合-->
										<?php if(has_post_thumbnail()): ?>
											<?php the_post_thumbnail(); ?>
										<!--サムネイル画像が存在しない場合-->
										<?php else: ?>
											<img src="http://design-ec.com/d/e_others_50/l_e_others_500.png" alt="">
										<?php endif; ?>
									</a>
								</div>
							</div>
							<div class="tp-ar-r">
								<div class="ar-content">
									<!--タイトル-->
									<div class="ar-title"><h2><?php the_title(); ?></h2></div>
									<!--カテゴリー-->
									<span class="ar-tag">
										<?php while(the_category()):?>
											<?php the_category(); ?>
										<?php endwhile;?>
									</span>
									<!--投稿日-->
									<span class="post-date"><?php the_time('Y年m月d日');?></span>
									<!--本文-->
									<p class="ar-dicription">
										<a href="<?php the_permalink(); ?>">
											<?php
												//brだけ残す
												if(mb_strlen($post->post_content, 'UTF-8')>50){
													$content= mb_substr(strip_tags($post->post_content, '<br>'), 0, 50, 'UTF-8');
													echo $content.'…';
												}else{
													echo strip_tags($post->post_content, '<br>');
												}
												//brとspanを残す
												if(mb_strlen($post->post_content, 'UTF-8')>50){
													$content= mb_substr(strip_tags($post->post_content, '<br><span>'), 0, 50, 'UTF-8');
													echo $content.'…';
												}else{
													echo strip_tags($post->post_content, '<br><span>');
												}
											?>
										</a>
									</p>
								</div>
							</div>
						</article>
						<?php endwhile;
					else: ?>
						<p>記事がありません。</p>
					<?php endif; ?>
				</div>
			</div>
			<!--main-l end-->

			<!-- メイン右 -->
			<?php get_sidebar(); ?>
			<!--main-r end-->
		</main>

		<?php get_footer(); ?>
sidebar.php
			<!-- メイン右 -->
			<div id="main-r">
				<aside>
					<div class="side">
						<?php if ( is_active_sidebar('sidebar') ) : ?>
						    <?php dynamic_sidebar('sidebar'); ?>
						<?php endif; ?>
					</div>
				</aside>
			</div>
			<!--main-r end-->
footer.php
		<!-- フッター -->
		<footer>
			<div id="footer">
				<div class="footer-content">
					<div class="footer-copright">
						<span>Copyright © <?php bloginfo( 'name' ); ?> </a>All Rights Reserved.</span>
					</div>
				</div>
			</div>
		</footer>
		<!--footer end-->
		<?php wp_footer(); ?>
	</body>
</html>
page.php
page.phpは固定ページで利用するファイルです。
固定ページはカテゴリーや投稿日はいらないと思いますので、index.phpをコピーして、不要な箇所を削除しています。
作成するのは簡単ですね笑。
		<?php get_header(); ?>

		<!-- メイン -->
		<main id="main">
			<!-- メイン左 -->
			<div id="main-l">
				<!-- 記事 -->
				<div class="article-container">
					<!--投稿している記事がある場合-->
					<?php if (have_posts()):
						while(have_posts()):
							the_post();
							?>
						<article class="sin-ar">
							<div class="sin-ar-r">
								<div class="sin-ar-content">
									<!--タイトル-->
									<div class="ar-title"><h2><?php the_title(); ?></h2></div>
									<!--本文-->
									<p class="ar-dicription">
										<?php the_content(); ?>
									</p>
								</div>
							</div>
						</article>
						<?php endwhile;
					else: ?>
						<p>記事がありません。</p>
					<?php endif; ?>
				</div>
			</div>
			<!--main-l end-->

			<!-- メイン右 -->
			<?php get_sidebar(); ?>
			<!--main-r end-->
		</main>

		<?php get_footer(); ?>
single.php
single.phpは記事の詳細ページで使うファイルです。
基本的にはindex.phpをコピーして作成し、詳細ページ用にclassを追加し、本文を全て表示するようにしています。
		<?php get_header(); ?>

		<!-- メイン -->
		<main id="main">
			<!-- メイン左 -->
			<div id="main-l">
				<!-- 記事 -->
				<div class="article-container">
					<!--投稿している記事がある場合-->
					<?php if (have_posts()):
						while(have_posts()):
							the_post();
							?>
						<article class="sin-ar">
							<div class="sin-ar-r">
								<div class="sin-ar-content">
									<!--タイトル-->
									<div class="ar-title"><h2><?php the_title(); ?></h2></div>
									<!--カテゴリー-->
									<span class="ar-tag">
										<?php while(the_category()):?>
											<?php the_category(); ?>
										<?php endwhile;?>
									</span>
									<!--投稿日-->
									<span class="post-date"><?php the_time('Y年m月d日');?></span>
									<!--本文-->
									<p class="ar-dicription">
										<?php the_content(); ?>
									</p>
								</div>
							</div>
						</article>
						<?php endwhile;
					else: ?>
						<p>記事がありません。</p>
					<?php endif; ?>
				</div>
			</div>
			<!--main-l end-->

			<!-- メイン右 -->
			<?php get_sidebar(); ?>
			<!--main-r end-->
		</main>

		<?php get_footer(); ?>
404.php
ページが存在しない場合に404.phpを利用します。
		<?php get_header(); ?>

		<!-- メイン -->
		<main id="main">
			<!-- メイン左 -->
			<div id="main-l">
				<!-- 記事 -->
				<div class="article-container">
					<p>記事がありません。</p>
				</div>
			</div>
			<!--main-l end-->

			<!-- メイン右 -->
			<?php get_sidebar(); ?>
			<!--main-r end-->
		</main>

		<?php get_footer(); ?>
WordPressテンプレートタグ
phpファイル作成で使用したテンプレートタグはこちらです。
使い方は上記のphpファイルを参考にしてみてくださいね。
| bloginfo(‘description’); | 管理画面で設定したディスクリプションを取得する。 |
|---|---|
| bloginfo(‘name’); | 管理画面で設定したブログ名を取得する。 |
| echo esc_url( home_url( ‘/’ ) ); | ホームのURLを取得する。 |
| wp_head(); | の直前に追加することでWordPressで必要な要素を自動で読み込む。 |
| wp_footer(); | の直前に追加することでWordPressで必要な要素を自動で読み込む。 |
| have_posts(); | 記事が存在するかチェックする。ループで繰り返す。 |
| the_post(); | 記事を取得する。ループの中で使用する。 |
| the_permalink(); | 記事へのURLを取得する。ループの中で使用する。 |
| the_title(); | 記事のタイトルを取得する。ループの中で使用する。 |
| the_category(); | 記事のカテゴリーを取得する。ループの中で使用する。 |
| the_time(‘Y年m月d日’);?> | 記事の投稿日を取得する。ループの中で使用する。 ‘Y/m/d’などのフォーマットも可能。 |
| the_content(); | 記事の本文を取得する。ループの中で使用する。 |
| is_active_sidebar( ‘サイドバーid’ ); | サイドバーが有効化されているかチェックする。 |
| dynamic_sidebar( ‘サイドバーid’ ); | 登録したサイドバーの情報を取得する。 |
| get_sidebar(); | sidebar.phpを読み込む。 |
| get_header(); | header.phpを読み込む。 |
| get_footer(); | footer.phpを読み込む。 |
レイアウトを最終調整する
/*
Theme Name: simple
Theme URL:https://anooblog.com
Author: ano
Author URL: https://anooblog.com
Version: 1
*/
h1, h2, h3, h4, h5, h6 {
    font-weight: bold;
}
p{
    color:#888;
}
/***********************/
/*ヘッダー*/
/***********************/
header{
    background-color:#ffb9cc;
}
/*タイトル*/
header .head-title h1{
    line-height: 2em;
    padding: 0;
    margin: 0;
    text-align: center;
}
header .head-title a{
    text-decoration: none;
    font-weight: bold;
    font-size: 30px;
    color:white;
    font-family: 'Amatic SC', cursive;
}

/***********************/
/*グローバルメニュー*/
/***********************/
#wide-navi{
    background-color:#b7e0d4;
}
.global-navi {
    border: solid 1px #E0DEDE;
    border-left: none;
    border-right: none;
}
.global-navi ul {
    margin: 0px;
    padding: 0px;
}
.global-navi ul li{
    box-sizing: border-box;
    list-style-type: none;
    width: 180px;
    height: 40px;
    text-align: center;
    border: solid 1px #f3f3f3;
    border-top:none;
    border-bottom:none;
}
.global-navi ul li a{
    text-decoration:none;
    display: block;
    overflow: hidden;
    width: 100%;
    height: 100%;
    line-height: 40px;
    text-decoration: none;
    position: relative;
    color:white;
    font-weight:bold;
}
.global-navi .flex {
    display: flex;
    justify-content: center;
}

/***********************/
/*メインコンテンツ*/
/***********************/
#main{
    margin: 0 10%;
    padding-top: 30px;
}

/***********************/
/*メインコンテンツ(左)*/
/***********************/
div#main-l {
    float: left;
    width: 100%;
    margin-right: -350px;
}
.tp-ar-r .ar-content{
    padding:0 10px;
}
/*トップページ 記事*/
#main-l article{
    border: 1px solid #f3f3f3;
    display: flex;
    padding: 5%;
    margin-bottom: 10px;
}
.article-container {
    margin-right: 360px;
    margin-left: 0px;
    background-color: rgb(255, 255, 255);
    border-radius: 4px;
}
/*記事内のサムネイル画像*/
.thum img {
    width: 150px;
    height: 100px;
    position: relative;
    padding: 8px;
    padding-bottom: 30px;
    border: 1px solid #ccc;
    -webkit-box-shadow: 3px 3px 3px #ccc;
       -moz-box-shadow: 3px 3px 3px #ccc;
            box-shadow: 3px 3px 3px #ccc;
    -ms-filter: "progid:DXImageTransform.Microsoft.Shadow(color=#cccccc,direction=135,strength=3,enabled=true)";
    filter: progid:DXImageTransform.Microsoft.Shadow(color=#cccccc,direction=135,strength=3,enabled=true); /* IE5.5+ */
    background: #fff;
}

/*記事タイトル*/
.ar-title {
    font-size: 0.6em;
}
/*記事カテゴリー*/
.ar-tag ul{
    list-style-type:none;
    padding:0;
    margin:0;
    display:flex;
}
.ar-tag ul li{
    padding:0 5px;
    margin:0 3px;
    border:1px solid #f3f3f3;
    background-color:#b7e0d4;
}
.ar-tag {
    font-size: 0.8em;
}
.ar-tag a{
    text-decoration:none;
    color:white;
}
/*記事日付*/
.post-date {
    font-size: 0.8em;
    color:#656666;
}
/*記事本文*/
.ar-dicription a {
    text-decoration: none;
    color:#656666;
}
.ar-dicription {
    font-size: 0.8em;
}

/***********************/
/*メインコンテンツ(右)*/
/***********************/
/*サイドバー*/
#main-r{
    padding: 0;
}
aside {
    float: right;
    width: 350px;
    padding: 0px;
}
#main-r .side {
    border: 1px solid #f3f3f3;
    padding: 5%;
}

/*サイドバーのタイトル*/
#main-r .side h4{
  color: #4a8674;
  text-shadow: 0 0 5px white;
  padding: 0.3em 0.5em;
  background: -webkit-repeating-linear-gradient(-45deg, #ffffff, #ffffff 3px,#b7e0d4 3px, #b7e0d4 7px);
  background: repeating-linear-gradient(-45deg, #ffffff, #ffffff 3px,#b7e0d4 3px, #b7e0d4 7px);
  border-radius:4px;
}

/*カテゴリー*/
.widget_categories ul li {
    list-style: none;
    font-size: 0.8em;
    color:#656666;
}
.widget_categories ul li a {
    text-decoration: none;
    color:#656666;
}
.widget_categories ul {
    padding-left: 0;
}

/*最近の投稿*/
.widget_recent_entries ul li {
    list-style: none;
    font-size: 0.8em;
}
.widget_recent_entries ul li a {
    text-decoration: none;
    color:#656666;
}
.widget_recent_entries ul {
    padding-left: 0;
}

/***********************/
/*フッター*/
/***********************/
footer {
    clear: both;
    padding: 0;
    text-align: center;
    background-color:#b7e0d4;
}
.footer-copright{
    font-size:0.8em;
    color:white;
}

/***********************/
/*詳細ページ*/
/***********************/
.sin-ar-r{
    width:100%;
}
.sin-ar img{
    width:100%;
    height:auto;
}
/*見出し(h2)*/
.sin-ar h2{
    font-size:18px;
}
/*見出し(h3)*/
.sin-ar h4{
    font-size:16px;
}
/*見出し(h4)*/
.sin-ar h4{
    font-size:14px;
}
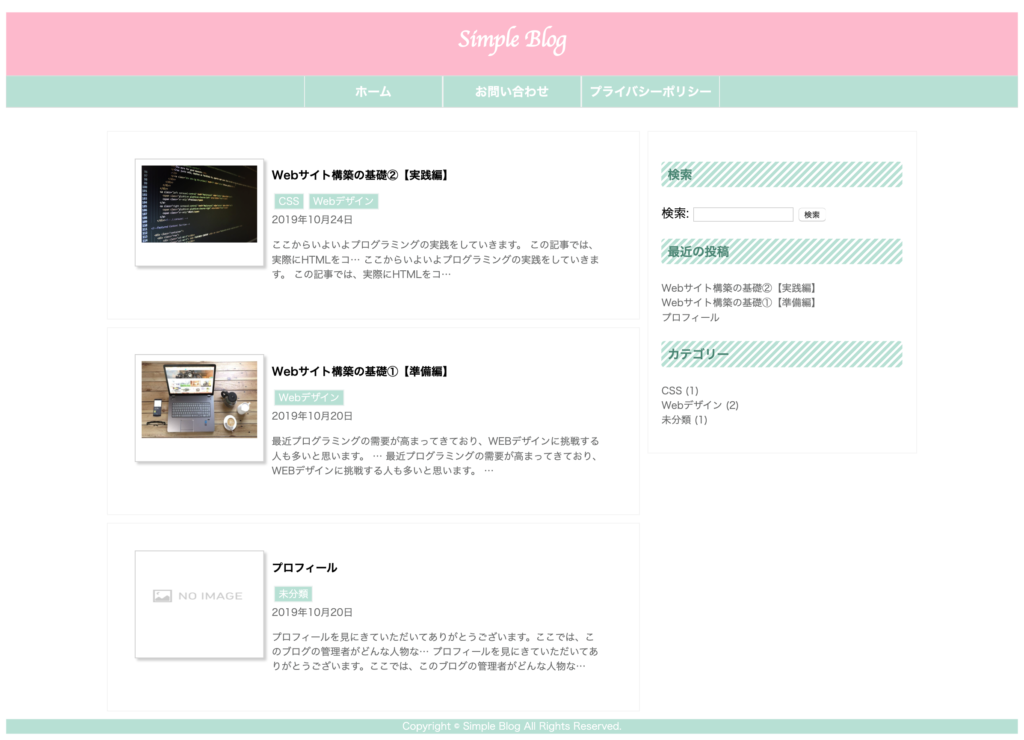
上記のcssを適用した結果がこちらです。
ちょっとポップな感じで作ってみましたw。
まとめ
大枠のデザインを決めるところから実際にコーディングするところまでを紹介しましたが、いかがだったでしょうか。
コピペで簡単なテーマが作れるので、ぜひ色々アレンジしてみてくださいね。
それではまたー


コメント